Doubling kitchen capacity isn’t about constant decluttering, but about systematically re-engineering your kitchen’s spatial logic.
- The most valuable storage gains come from activating unused vertical and corner spaces with the right hardware.
- Optimizing your workflow by organizing items by task—not just by category—dramatically reduces cooking time and stress.
Recommendation: Start by auditing your cooking process to create ‘task-based super-zones’; this single change can make a small kitchen feel twice as large.
For many homeowners, the kitchen feels like a constant game of Tetris. You shuffle jars to find the right spice, stack pans precariously, and watch as countertops disappear under appliances you have nowhere else to put. The common advice is to declutter, to buy more bins, or to simply get rid of things. While these actions provide temporary relief, they don’t solve the core problem: your kitchen’s storage isn’t working for you. It lacks a coherent system.
The frustration you feel isn’t due to a lack of space, but a lack of spatial logic. A truly organized kitchen isn’t just tidy; it’s an efficient machine where every item has a purpose-driven home. The secret to doubling your capacity lies not in adding more shelves, but in fundamentally rethinking how you use the space you already have. It’s about implementing smart systems that unlock hidden potential and streamline your every move.
But what if the key wasn’t just about where you store things, but how that storage impacts your daily routine? This guide moves beyond simple tidying tips to reveal a professional organizer’s systematic approach. We will explore the principles of workflow choreography, showing you how to make your kitchen move with you, not against you. Forget the endless cycle of purging and reorganizing. It’s time to install a system that brings lasting order and a sense of calm control.
This article will provide a clear roadmap to reclaim your kitchen. We will dissect the most common storage mistakes and offer systematic, high-impact solutions to transform your space from cluttered to highly functional. Prepare to see your kitchen’s potential in a whole new light.
Summary: A Systematic Guide to Doubling Kitchen Storage Capacity
- Why the space above your cabinets is the most wasted storage area?
- Pull-out drawers vs. Lazy Susans: Which solves the deep corner cabinet problem?
- The “Zone Method” mistake that makes cooking take 10 minutes longer
- How decanting pasta and flour actually saves 30% of pantry shelf space?
- When to do a “pantry purge” to keep the smart storage working?
- The $10 investment that saves your dining table from permanent stains
- How to store 50% of your decor to keep the display fresh and airy?
- How Much Can Low-Energy Lighting Save You on Electricity Bills Annually?
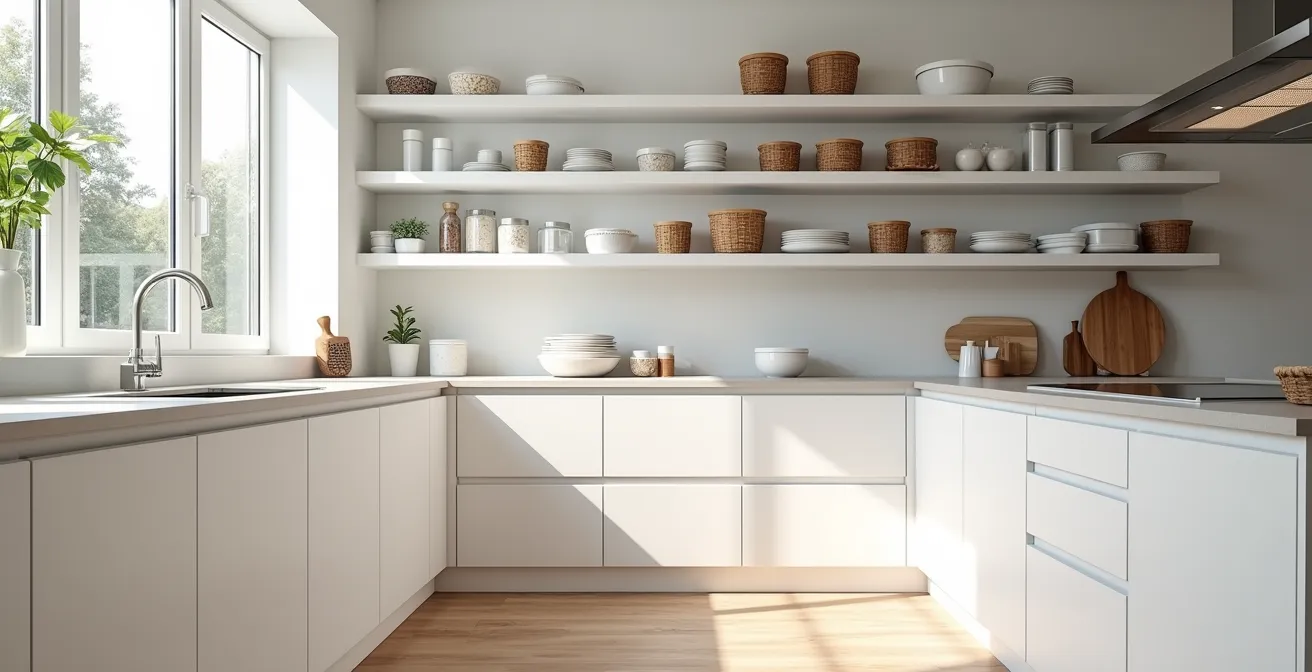
Why the space above your cabinets is the most wasted storage area?
The awkward, empty expanse between the top of your kitchen cabinets and the ceiling is one of the most chronically underused areas in any home. Out of sight and difficult to reach, it often becomes a dusty, forgotten void or a graveyard for mismatched decorative items. Its primary flaw is inaccessibility, which leads us to mentally write it off as unusable. However, with a strategic approach, this “dead space” can be transformed into a valuable ‘archive zone’ for your kitchen.
The key is to dedicate this area to items you don’t need daily access to. Think seasonal appliances (like a turkey roaster or ice cream maker), special occasion dishware, or bulk pantry backstock. By moving these items from prime, eye-level cabinet real estate to this upper zone, you free up your most accessible shelves for everyday essentials. This single act of relocation can immediately make your daily routine feel less cluttered and more efficient.
To make this space both functional and visually appealing, consider these systematic steps:
- Use decorative storage bins to create organized ‘archive zones’ for seasonal items.
- Store cookbooks horizontally to maximize the long, linear space.
- Label all containers clearly so you can identify their contents from below without a stepladder.
- Create a simple digital inventory (like a note on your phone) to track what’s stored up high, preventing you from forgetting what you own.
- For a touch of design, add a few potted plants to draw the eye upward and integrate the storage into your kitchen’s aesthetic.
By treating the space above your cabinets with intention, you reclaim a significant amount of storage and implement a core principle of professional organizing: matching the accessibility of storage to the frequency of use.
Pull-out drawers vs. Lazy Susans: Which solves the deep corner cabinet problem?
The corner cabinet is the Bermuda Triangle of the kitchen—a deep, dark space where pots, pans, and small appliances go to be forgotten. Its awkward shape makes accessing anything stored in the back a frustrating excavation project. Fortunately, modern hardware offers two primary solutions to this spatial puzzle: pull-out drawers and Lazy Susans. Each reclaims this difficult space, but they do so with different strengths tailored to different needs. A Lazy Susan offers rotational access, making it ideal for smaller, uniform items like jars, cans, and spices that can be easily viewed with a simple spin.
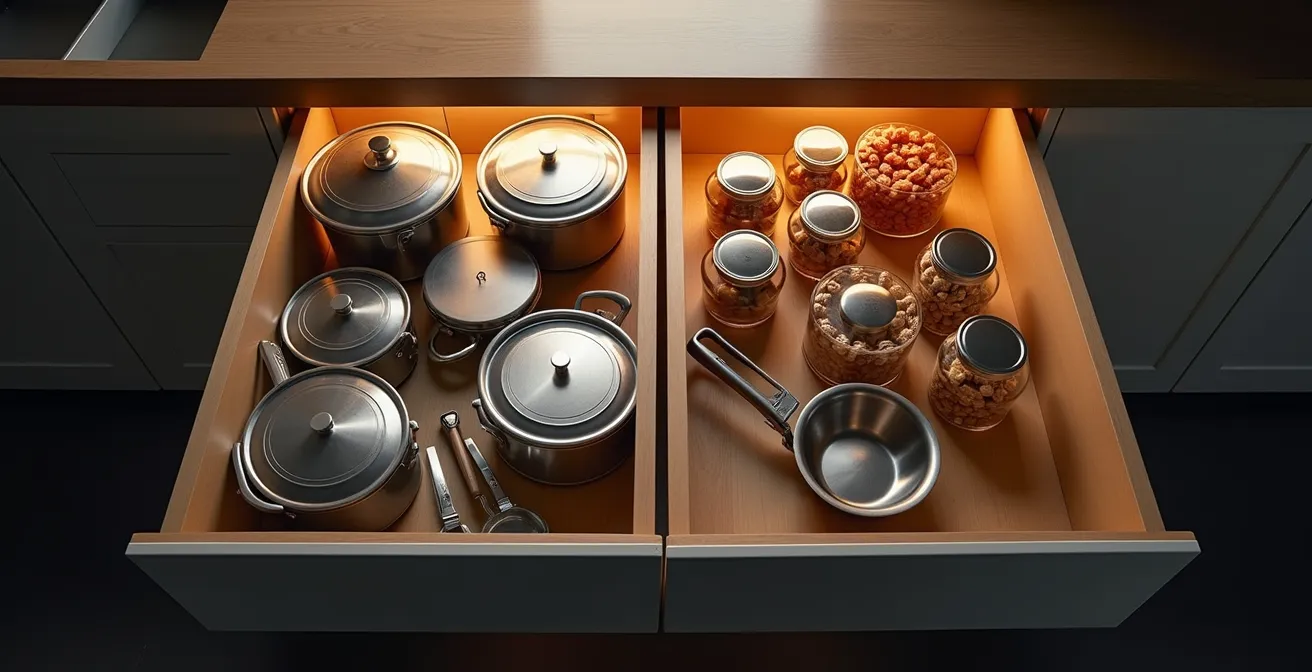
In contrast, pull-out drawers (or blind corner optimizers) bring the contents of the cabinet out into the open. Their linear movement provides full, unobstructed visibility and access to everything inside. This makes them far superior for storing large, heavy, or awkwardly shaped items like stand mixers, stacks of pots, or bulky food processors. While a Lazy Susan might wobble under the weight of heavy cookware, a well-built pull-out system is designed for high weight capacity. The choice between them is a matter of spatial logic: rotational access for small items, and linear access for large ones.
To make an informed decision, it’s essential to compare their features side-by-side. This analysis clarifies which solution best fits your specific storage challenges and budget.
| Feature | Pull-Out Drawers | Lazy Susan |
|---|---|---|
| Accessibility | Full extension for complete visibility | 360-degree rotation access |
| Weight Capacity | High – ideal for pots and pans | Limited – may wobble when overloaded |
| Best For | Large, awkward shapes | Small items like jars and spices |
| Installation Complexity | More complex DIY project | Simple DIY installation |
| Price Range | $500-$2000 professional installation | $50-$200 DIY option |
Ultimately, solving the corner cabinet problem isn’t just about adding hardware; it’s about choosing the right mechanism to bring hidden items back into your active kitchen workflow.
The “Zone Method” mistake that makes cooking take 10 minutes longer
The “Zone Method” is a cornerstone of kitchen organization, suggesting you group items into logical zones: a prep zone near the sink, a cooking zone by the stove, and a storage zone for food. It’s a sound principle, but its common application contains a critical flaw. Most people interpret it as organizing by category—all oils together, all spices together, all utensils together. This is the mistake that adds unnecessary time and movement to your cooking process.
The true path to efficiency lies in a more nuanced approach: organizing by task. This is the art of “workflow choreography,” where you design your space to support the sequence of your actions. For example, when you sauté vegetables, you need oil, salt, pepper, a spatula, and a pan. The common method might have you walking to the pantry for oil, to a spice rack across the room, and to a drawer for the spatula. This constant back-and-forth is inefficient.
A smarter system creates task-based “super-zones” that co-locate everything needed for a specific job. The goal is to minimize movement and decision-making while you’re in the middle of cooking.
Case Study: Kitchen Workflow Optimization Through Dynamic Zoning
A kitchen reorganization case study found that implementing ‘Dynamic Workflow Zoning’ – grouping items by task rather than type – can significantly reduce cooking preparation time. For example, a homeowner created a ‘Prep/Cook super-zone’ in their compact kitchen. By storing frequently used oils, spices, and primary prep tools in the cabinet directly next to the stove, rather than scattered by category throughout the kitchen, they eliminated unnecessary movement and created a seamless, efficient workflow from chopping board to pan.
To implement this in your own kitchen, you must first become aware of your own movement patterns. The following audit will help you identify the disconnects in your current setup and rebuild your zones around your personal workflow.
Your Kitchen Workflow Audit Checklist: Creating Task-Based Zones
- Map your movement patterns while preparing a typical meal, noting every time you walk to a different cabinet or drawer.
- Identify items that are consistently used together but currently stored in separate locations (e.g., coffee beans and mugs).
- Create task-based zones: a “Coffee Station” with cups, sugar, and machine; a “Baking Zone” with flour, sugar, and mixing bowls; a “Sauté Station” by the stove with oils and spices.
- Apply the ‘Point of First Use’ principle: store an item where you first reach for it during a task.
- Test your new arrangement for one week and adjust it based on your actual, real-world usage patterns for a truly personalized system.
How decanting pasta and flour actually saves 30% of pantry shelf space?
Decanting dry goods like pasta, flour, and cereal into clear, uniform containers is often seen as a purely aesthetic choice—something for hyper-organized influencers. However, this practice is rooted in a powerful principle of spatial geometry that can dramatically increase your pantry’s capacity. The secret isn’t the containers themselves, but their shape. Most original packaging—bags of flour, boxes of pasta, sacks of rice—is irregular, flimsy, and inefficient.
These assorted shapes create pockets of wasted air on a shelf. You can’t stack a floppy bag of brown sugar on top of a narrow box of spaghetti. When you transfer these items into uniform, square, or rectangular containers, you replace chaotic forms with modular, stackable blocks. This allows you to take full advantage of a shelf’s vertical height and depth, eliminating the dead air and maximizing storage density. The visual impact is clean and satisfying, but the functional benefit is even greater.
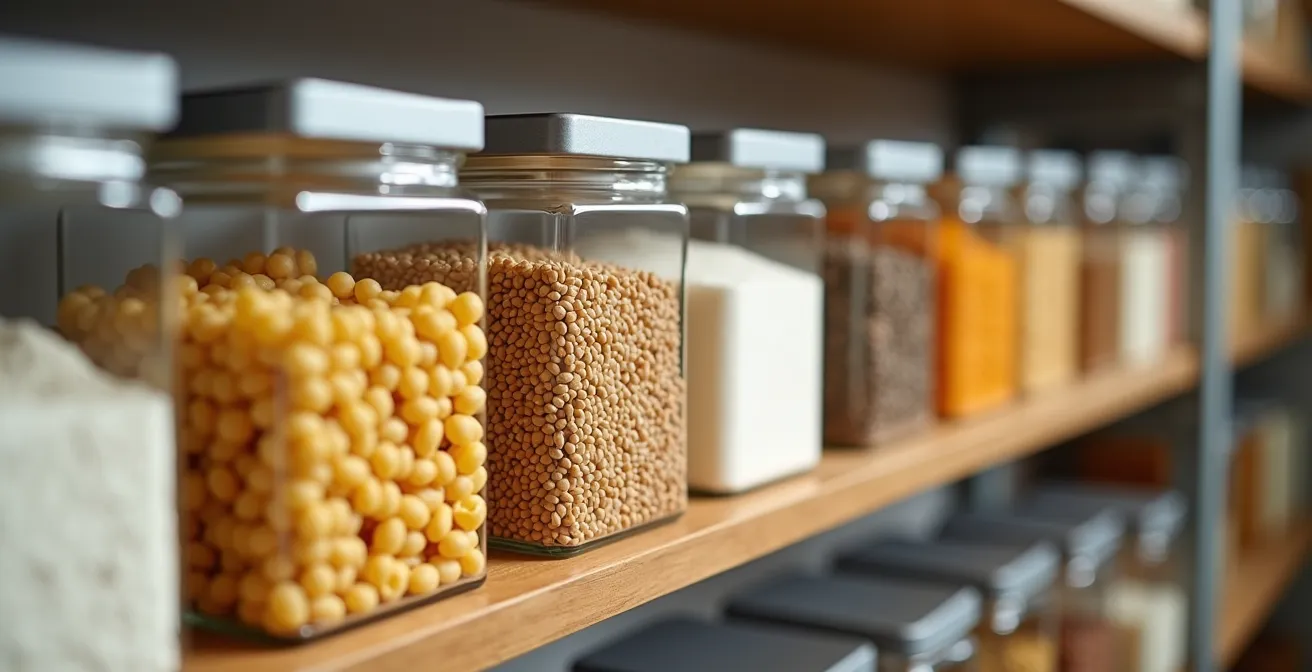
The efficiency gain is not trivial. By moving from inefficient, irregular packaging to a system of modular, stackable containers, you are essentially turning wasted air into usable storage. This systematic approach transforms your pantry from a jumble of packages into a highly organized grid. In fact, analysis shows that switching from bags to square containers can achieve up to 30% pantry space savings. This is capacity you didn’t know you had, unlocked by applying a simple geometric principle.
Beyond space, this system provides instant visibility, reducing the chance of buying duplicates and making it easy to see when you’re running low. It’s a small change with a threefold benefit: more space, less waste, and a calmer, more controlled pantry environment.
When to do a “pantry purge” to keep the smart storage working?
Once you’ve implemented smart storage solutions, the next challenge is maintaining that hard-won order. The idea of a “pantry purge” often conjures images of a massive, once-a-year overhaul that leaves you exhausted. A more effective and less daunting approach is to shift your mindset from “purging” to a process of continuous, invisible maintenance. Instead of waiting for chaos to set in, you should rely on clear trigger signals that prompt small, immediate actions.
The first and most obvious trigger is when you can’t find an item within 15 seconds. This is a clear sign that your system is breaking down, either because items have been misplaced or because clutter is starting to obscure your view. Another critical signal is when you find yourself buying duplicates of items you already have, especially non-perishables. This indicates that your inventory is no longer visible at a glance, costing you money and space. Finally, the accumulation of expired items, particularly in the back of shelves, is a red flag that your stock rotation has failed.
Responding to these triggers doesn’t require a full-day project. It can be as simple as taking five minutes to reposition a few items, update your shopping list, or dispose of an expired can. By integrating these micro-adjustments into your weekly routine—for instance, doing a quick scan before you go grocery shopping—you prevent the system from ever reaching a critical point of failure.
This approach transforms maintenance from a dreaded chore into a series of small, manageable habits. It’s the difference between preventative care and emergency surgery for your pantry, ensuring your smart storage system continues to work for you day in and day out.
The $10 investment that saves your dining table from permanent stains
In a small home, every surface must be prepared to play multiple roles. For those with limited counter space, the dining table often becomes an auxiliary prep station, a homework desk, or a craft area. This heavy use, however, brings the constant anxiety of causing damage—water rings from a cold glass, scorch marks from a hot pan, or permanent stains from a food spill. A simple, inexpensive investment in modern table protectors can do more than just prevent damage; it can effectively expand your kitchen’s functional footprint.
We’re not talking about old-fashioned, bulky tablecloths. A set of high-quality, heat-resistant silicone trivets or a sleek, roll-up table protector can be purchased for under $20 and offers immense peace of mind. These tools create a safe, temporary barrier, instantly transforming your precious dining surface into a robust, worry-free workspace. You can place a hot pot directly from the stove onto a silicone mat or chop vegetables on a board without fearing scratches on the wood beneath.
This small investment fundamentally changes your relationship with the space. It removes the hesitation to use the table for fear of ruining it, thereby unlocking its full potential as a multi-functional surface.
Case Study: Multi-functional Table Protection Solutions
A study focused on small kitchen optimization revealed a significant behavioral shift among homeowners who invested in quality table protectors. As documented in an analysis of multi-functional solutions, participants reported using their dining tables as primary food prep stations and for various other tasks without the previous anxiety about damage. This simple change effectively doubled their perceived functional kitchen workspace for a minimal cost, highlighting how protecting a surface encourages its use and expands a home’s utility.
By making your dining table more resilient, you’re not just saving it from stains; you are actively adding square footage to your usable kitchen area. It’s a strategic move to maximize every asset in a compact home.
How to store 50% of your decor to keep the display fresh and airy?
A common struggle in any home, especially a smaller one, is the tension between a desire for personal, decorative touches and the need for a clean, uncluttered environment. Too many objects can make a space feel busy and cramped, yet a complete lack of them can feel sterile. The solution is not to get rid of your cherished decor, but to manage it with a ‘Capsule Decor’ rotation system. The core principle is simple: at any given time, half of your decorative items are in storage, allowing the other half to shine.
This system forces you to be a curator of your own space. By rotating your decor seasonally or simply when you want a change, you keep your displays feeling fresh and intentional. The “visual noise” is cut in half, making the entire room feel more airy and organized. This also solves the storage problem itself, as you are planning for storage from the outset rather than scrambling to find a place for clutter.
To implement this system effectively, you need a clear, repeatable process. This turns a potentially chaotic collection of items into a manageable library of decor.
- Create two seasonal decor ‘capsules’: for example, one with warm tones and cozy textures for fall/winter, and another with cool tones and lighter materials for spring/summer.
- Replace pure decor with ‘functional beauty’: opt for items that are both beautiful and useful, like sculptural wooden cutting boards, a vintage pitcher for holding utensils, or a beautiful ceramic bowl for fruit.
- Implement a Photo Inventory system: for items stored in opaque boxes, tape a quick photo of the contents to the outside. This saves you from having to open every box to find what you’re looking for.
- Apply the ‘One-In, Two-Out’ rule when you acquire a new decorative item. To prevent clutter creep, you must store or donate two other items.
- Store one capsule collection while displaying the other. This simple swap automatically solves the problem of storing 50% of your decor at all times.
By adopting a rotation system, you get the best of both worlds: a home that reflects your personality and an environment that feels spacious and serene.
Key Takeaways
- The most significant storage gains are found by activating underused vertical and corner spaces with purpose-built hardware.
- True kitchen efficiency comes from organizing by task (workflow), not just by category.
- Using uniform, stackable containers is a geometric principle that maximizes storage density and can reclaim up to 30% of pantry space.
How Much Can Low-Energy Lighting Save You on Electricity Bills Annually?
After you’ve brilliantly organized every cabinet and pantry shelf, there’s one final step to making your new system truly functional: visibility. A deep pantry or a dark corner cabinet, no matter how well-organized, remains a “dead zone” if you can’t see what’s inside. Under-cabinet and in-cabinet LED lighting is the solution that activates these spaces, transforming them from dark voids into fully accessible storage. But beyond the organizational benefits, this upgrade also offers a tangible financial return.
Modern low-energy LED lighting is incredibly efficient. While the primary goal is to illuminate your workspace and storage, the secondary benefit is a reduction in your energy consumption. A well-placed LED strip provides bright, clear light exactly where you need it, eliminating the need to turn on powerful overhead lights for a simple task. This targeted approach is not only more effective but also more economical. In fact, an analysis of kitchen upgrades shows that LED under-cabinet lighting provides dual benefits with around $15/year in electricity savings plus the functional gain of newly usable workspace.
For the ultimate in smart storage, combining LEDs with motion sensors creates a system that is both effortless and efficient. The light turns on the moment you open a cabinet or pantry door and turns off automatically when you close it, ensuring no energy is wasted.
Case Study: Motion-Sensor LEDs for Smart Storage Access
A home organization project detailed how the implementation of motion-sensor LED strips inside deep pantries and corner cabinets completely transformed previously dark, unusable spaces into fully functional storage areas. The homeowners reported a significant reduction in food waste and duplicate purchases because, for the first time, all items became instantly visible and accessible the moment a cabinet was opened. The automatic on/off function made the system feel seamlessly integrated and highly efficient.
Proper lighting is the final layer of a smart storage system. It ensures that every organizational effort you’ve made pays off by making every single item in your kitchen both visible and easy to retrieve.
Start today by choosing one area—a single cabinet, a cluttered drawer, or the space above your refrigerator—and apply one of these principles. The feeling of relief and control that comes from establishing order in one small zone is the catalyst for transforming your entire kitchen.
Frequently Asked Questions on Smart Kitchen Storage
What are the key triggers that signal it’s time for a pantry purge?
When you can’t find an item in 15 seconds, when you buy duplicates of items you already have, or when expired items start accumulating in the back of shelves.
How can I maintain pantry organization without major purges?
Implement a ‘One-In, One-Out’ rule for staples and use First-In, First-Out (FIFO) rotation for canned goods to create a continuous, invisible maintenance process.
What’s the ‘Reverse Shopping List’ technique?
Before grocery shopping, ‘shop’ your own pantry first and build your list around using what you already have, creating a natural purge and rotation cycle.